
ASP.Net is the standard web development framework that is provided by Microsoft for developing server-side applications. Since ASP.Net has been around for quite a long time for development, Docker has ensured that it has support for ASP.Net.
Prerequisites
The following steps need to be carried out first for running ASP.Net.
Step 1 − Since this can only run on Windows systems, you first need to ensure that you have either Windows 10 or Window Server 2016.
Step 2 − Next, ensure that Hyper-V is and Containers are installed on the Windows system. To install Hyper–V and Containers, you can go to Turn Windows Features ON or OFF. Then ensure the Hyper-V option and Containers is checked and click the OK button.

The system might require a restart after this operation.
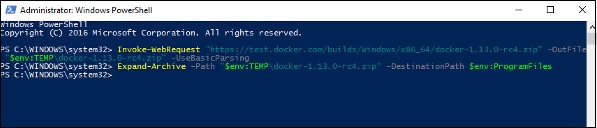
Step 3 − Next, you need to use the following Powershell command to install the 1.13.0rc4 version of Docker. The following command will download this and store it in the temp location.
Invoke-WebRequest "https://test.docker.com/builds/Windows/x86_64/docker-1.13.0-
   rc4.zip" -OutFile "$env:TEMP\docker-1.13.0-rc4.zip" –UseBasicParsing

Step 4 − Next, you need to expand the archive using the following powershell command.
Step 4 − Next, you need to expand the archive using the following powershell command.
Expand-Archive -Path "$env:TEMP\docker-1.13.0-rc4.zip" -DestinationPath $env:ProgramFiles
Step 5 − Next, you need to add the Docker Files to the environment variable using the following powershell command.
$env:path += ";$env:ProgramFiles\Docker"
Step 6 − Next, you need to register the Docker Daemon Service using the following powershell command.
dockerd --register-service
Step 7 − Finally, you can start the docker daemon using the following command.
Start-Service Docker
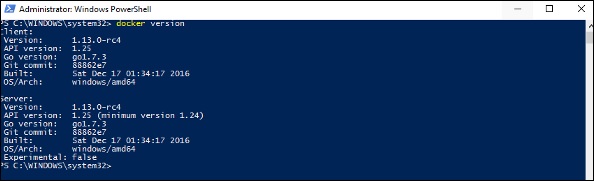
Use the docker version command in powershell to verify that the docker daemon is working
docker version command in powershell to verify that the docker daemon is working
Installing the ASP.Net Container
Let’s see how to install the ASP.Net container.
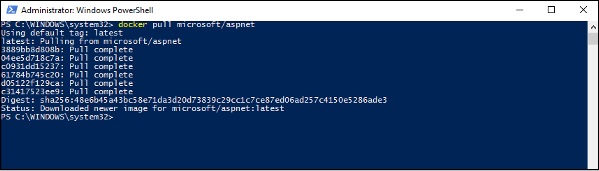
Step 1 − The first step is to pull the image from Docker Hub. When you log into Docker Hub, you will be able to search and see the image for Microsoft/aspnet as shown below. Just type in asp in the search box and click on the Microsoft/aspnet link which comes up in the search results.

Step 2 − You will see that the Docker pull command for ASP.Net in the details of the repository in Docker Hub.

Step 3 − Go to Docker Host and run the Docker pull command for the microsoft/aspnet image. Note that the image is pretty large, somewhere close to 4.2 GB.
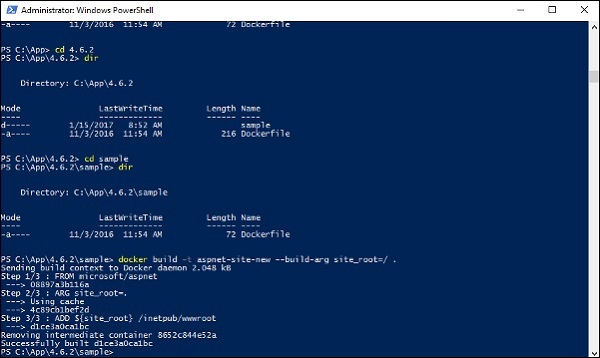
Step 4 − Now go to the following location https://github.com/Microsoft/aspnet-docker and download the entire Git repository.
Step 5 − Create a folder called App in your C drive. Then copy the contents from the 4.6.2/sample folder to your C drive. Go the Docker File in the sample directory and issue the following command −
docker build –t aspnet-site-new –build-arg site_root=/
The following points need to be noted about the above command −
- It builds a new image called aspnet-site-new from the Docker File.
- The root path is set to the localpath folder.
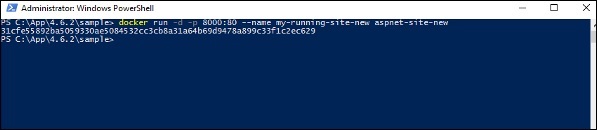
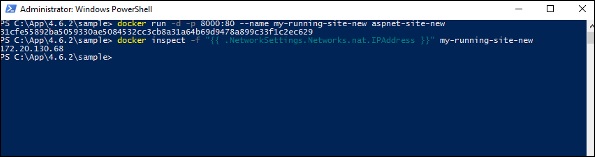
Step 6 − Now it’s time to run the container. It can be done using the following command −
docker run –d –p 8000:80 –name my-running-site-new aspnet-site-new
Step 7 − You will now have IIS running in the Docker container. To find the IP Address of the Docker container, you can issue the Docker inspect command as shown below.
I have been exploring for a bit for any high-quality articles or
weblog posts in this sort of space . Exploring in Yahoo
I at last stumbled upon this web site. Studying this information So i am glad to express that I have an incredibly good
uncanny feeling I came upon just what I needed.
I so much unquestionably will make certain to do not overlook this website
and give it a glance on a relentless basis.
Thanks
Thanks for sharing, this is a fantastic blog post.Much thanks again. Really Cool.