Internationalization (i18n) is a must required feature for any modern web application. Internationalization enables the application to target any language in the world. Localization is a part of the Internationalization and it enables the application to render in a targeted local language. Angular provides complete support for internationalization and localization feature.
Let us learn how to create a simple hello world application in different language.
Create a new Angular application using below command −
cd /go/to/workspace
ng new i18n-sample
Run the application using below command −
cd i18n-sample
npm run start
Change the AppComponent’s template as specified below −
<h1>{{ title }}</h1>

<div>Hello</div>
<div>The Current time is {{ currentDate | date : 'medium' }}</div>
Add localize module using below command −
ng add @angular/localize
Restart the application.
LOCALE_ID is the Angular variable to refer the current locale. By default, it is set as en_US. Let us change the locale by using in the provider in AppModule.
import { BrowserModule } from '@angular/platform-browser';
import { LOCALE_ID, NgModule } from '@angular/core';

import { AppComponent } from './app.component';

@NgModule({
   declarations: [
      AppComponent
   ],
   imports: [
      BrowserModule
   ],
   providers: [ { provide: LOCALE_ID, useValue: 'hi' } ],

   bootstrap: [AppComponent]
})
export class AppModule { }
Here,
- LOCALE_ID is imported from @angular/core.
- LOCALE_ID is set to hi through provider so that, the LOCALE_ID will be available everywhere in the application.
Import the locale data from @angular/common/locales/hi and then, register it using registerLocaleData method as specified below:
import { Component } from '@angular/core';

import { registerLocaleData } from '@angular/common';
import localeHi from '@angular/common/locales/hi';

registerLocaleData(localeHi);

@Component({
   selector: 'app-root',
   templateUrl: './app.component.html',
   styleUrls: ['./app.component.css'],
})
export class AppComponent {
   title = 'Internationzation Sample';
}
Create a local variable, CurrentDate and set current time using Date.now().
export class AppComponent {
   title = 'Internationzation Sample';

   currentDate: number = Date.now();
}
Change AppComponent’s template content and include the currentDate as specified below −
<h1>{{ title }}</h1>

<div>Hello</div>
<div>The Current time is {{ currentDate | date : 'medium' }}</div>
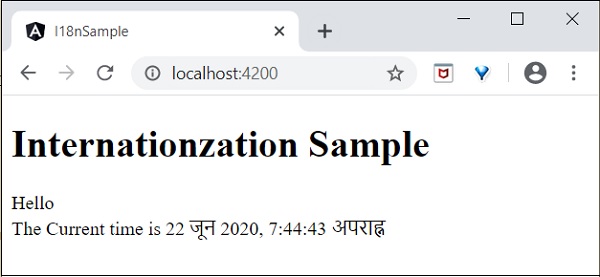
Check the result and you will see the date is specified using hi locale.

We have changed the date to current locale. Let us change other content as well. To do it, include i18n attribute in the relevant tag with format, title|description@@id.
<h1>{{ title }}</h1>

<h1 i18n="greeting|Greeting a person@@greeting">Hello</h1>
<div>
   <span i18n="time|Specifiy the current time@@currentTime">
      The Current time is {{ currentDate | date : 'medium' }}
   </span>
</div>
Here,
- hello is simple translation format since it contains complete text to be translated.
- Time is little bit complex as it contains dynamic content as well. The format of the text should follow ICU message format for translation.
We can extract the data to be translated using below command −
ng xi18n --output-path src/locale
Command generates messages.xlf file with below content −
<?xml version="1.0" encoding="UTF-8" ?>
<xliff version="1.2" xmlns="urn:oasis:names:tc:xliff:document:1.2">
   <file source-language="en" datatype="plaintext" original="ng2.template">
      <body>
         <trans-unit id="greeting" datatype="html">
            <source>Hello</source>
            <context-group purpose="location">
               <context context-type="sourcefile">src/app/app.component.html</context>
               <context context-type="linenumber">3</context>
            </context-group>
            <note priority="1" from="description">Greeting a person</note>
            <note priority="1" from="meaning">greeting</note>

         </trans-unit>
         <trans-unit id="currentTime" datatype="html">
            <source>
                        The Current time is <x id="INTERPOLATION" equiv-text="{{ currentDate | date : 'medium' }}"/>
            </source>
            <context-group purpose="location">
               <context context-type="sourcefile">src/app/app.component.html</context>
               <context context-type="linenumber">5</context>
            </context-group>
            <note priority="1" from="description">Specifiy the current time</note>
            <note priority="1" from="meaning">time</note>
         </trans-unit>
      </body>
   </file>
</xliff>
Copy the file and rename it to messages.hi.xlf
Open the file with Unicode text editor. Locate source tag and duplicate it with target tag and then change the content to hi locale. Use google translator to find the matching text. The changed content is as follows −


Open angular.json and place below configuration under build -> configuration
"hi": {
   "aot": true,
   "outputPath": "dist/hi/",
   "i18nFile": "src/locale/messages.hi.xlf",
   "i18nFormat": "xlf",
   "i18nLocale": "hi",
   "i18nMissingTranslation": "error",
   "baseHref": "/hi/"
},
"en": {
   "aot": true,
   "outputPath": "dist/en/",
   "i18nFile": "src/locale/messages.xlf",
   "i18nFormat": "xlf",
   "i18nLocale": "en",
   "i18nMissingTranslation": "error",
   "baseHref": "/en/"
}
Here,
We have used separate setting for hi and en locale.
Set below content under serve -> configuration.
"hi": {
   "browserTarget": "i18n-sample:build:hi"
},
"en": {
   "browserTarget": "i18n-sample:build:en"
}
We have added the necessary configuration. Stop the application and run below command −
npm run start -- --configuration=hi
Here,
We have specified that the hi configuration has to be used.
Navigate to http://localhost:4200/hi and you will see the Hindi localised content.

Finally, we have created a localized application in Angular.